To get us ready for the cooler weather that comes with the fall, I put together a pretty lace scarf. I wanted the stitches to be light and airy, since fall doesn't mean freezing temperatures, only cool, crisp air. I hope you all enjoy it!
Fall Lace Scarf
*Materials:
*H Hook (5.50MM)
*1-2 skein(s) Caron Simply Soft Yarn in Garnet or Autumn Red
*Scissors
*A book (yes, seriously)
Main Piece:
-Chain 27
-Row 1: DC in 3rd chain from hook, and in each chain to end of row. Ch 3, turn.
-Row 2: Skip first DC. *[1 DC, ch 1, 1 DC] in next stitch. Skip next 2 DC* and repeat from * to last 2 stitches. Skip next stitch. DC in last stitch. Ch 3, turn.
-Row 3: 3 DC in each ch space to to last ch space. 1 DC in last ch space. Ch 3, turn.
Repeat rows 2 and 3 to desired length.
**NOTE: My scarf has the pattern repeated to 70 rows, but this is because I ran out of yarn (I used less than 1 skein of yarn, probably about 3/4 of a skein). This is a good length for one of my daughters, but not for an adult. I'd recommend continuing the pattern to at least 100 rows and then deciding how to proceed from there.
-When desired length has been achieved, repeat row 2.
-DC in each stitch and chain across. Tie off, weave in ends.
Fringe:
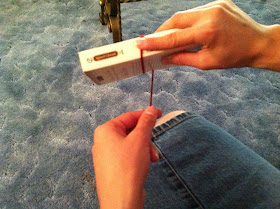
Here's where you book comes in. :)
Take your yarn and wrap it width-wise around the book. Start at the spine:
You need to determine how much fringe you want. I did 1 string (2 strands when attached) per DC space. I think it would have looked even better with 2 strings (4 strands when attached) per DC space, but alas, I ran out of yarn. For 1 string per space, you'll need 25 strings, so wrap it around 25 times. Double that if you'd like.
When you have it wrapped around the amount of times desired, Cut straight across the middle of the spine.
To attach the strands, decide which end you want to begin with. Starting from the left, insert your hook in the first stitch. Take your first string and place the center of it on the end of your hook, then pull it up through the stitch. Hook the remaining strands and pull through the loop. Continue on each stitch across.


Beautiful scarf. I love the pictures that explain the fringe.
ReplyDeleteSo simple yet so elegant -- thanks for the lovely pattern.
ReplyDeleteWelcome to the world of blogging! Gorgeous scarf. Love that last picture of it with the clock and flowers!
ReplyDeleteThank you for the comments! I'm excited to get some more fun projects up!
ReplyDeleteWe are getting family pictures sometime in Oct. and I'm having all my boys wear Red sweaters, but I'm going to try to find a cute gray sweater and wear a RED SCARF for accent !! Hopefully I can find one as cute as yours :) Good job mama !
ReplyDeleteYour scarf is very nice. Thanks for sharing your pattern. :)
ReplyDeleteLooks very soft and cozy. Good job:-)
ReplyDeletelooks very nice - getting ready to grab my hook and give it a go!
ReplyDeleteI /really/ want to crochet this scarf, but I feel like I'm doing it wrong. :L Maybe I'm not understanding the second row instructions. or the third.
ReplyDelete