Background

Showing posts with label Easy. Show all posts

Friday, October 26, 2012

Star Flower Applique

 Super Easy Star Flower Applique

Magic Circle (or ch 4, join)
10 SC in ring.  Join with sl st.
-*HDC, DC, TC in next st.  Ch 3, sl st in top of TC (picot).  TC, DC, HDC in next st.*  Repeat to end, creating 5 "petals" and then join with a sl st.  Tie off and hide ends. 

Tuesday, October 23, 2012

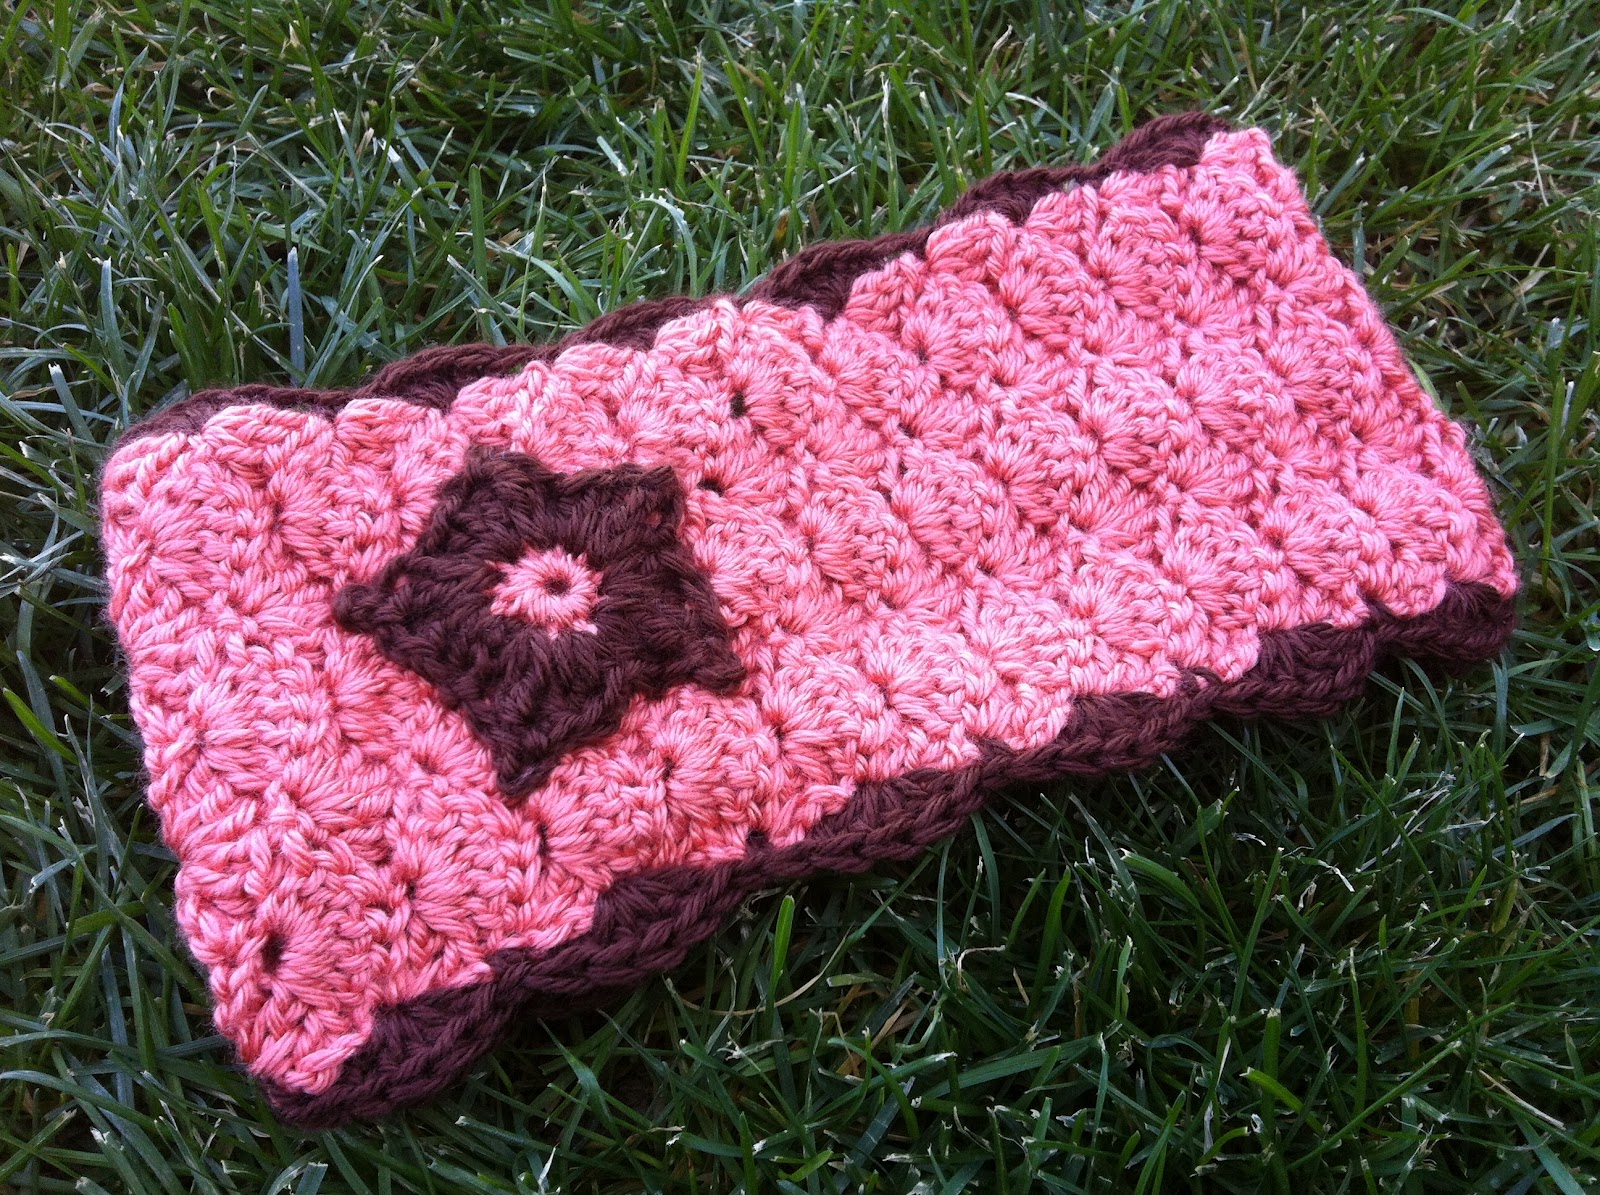
Shell Headband Earwarmer


The star applique will be in an upcoming post.  
 
Materials:
I Hook
Caron Simply Soft Yarn (I used Persimmon and Chocolate)
Button
Need & Thread (to attach button)

Ch 14.  
R1: SC in 2nd ch from hook.  Sk 2 st.  5 DC in next ch.  Sk 2 st.  1 SC.  Sk 2 st.  5 DC in next ch. Sk 2 st.  SC in final ch.  (2 shells created)
R2: Ch 2 (counts as SC).  4 DC in same st.  *Sk 2 st.  5 DC in next st.  Sk 2 st.  1 SC.* Repeat to end.  (3 shells)
R3: Ch 3 (counts as DC).  2 DC in same st (Half shell).  Sk 2 st.  1 SC.  Sk 2 st.  5 DC.  Sk 2 st.  1 SC.  Sk 2 st.  5 DC.  Sk 2 st.  1 SC.  Sk 2 st.  3 DC.  (Half shell).
R4-R38:  Repeat R2 and R3 for pattern.
R39: Ch 1.  SC3tog.  Sk 2 st.  5 DC.  Sk 2 st.  1 SC.  Sk 2 st.  5 DC.  Sk 2 st.  1 SC.  SC3tog in next 2 st and top of turning ch.  Ch 1 to secure.  

Border:
Join yarn in SC in the middle of final row, between shells.  Continue the fan pattern used in headband (using 5 DC's to create shell and using 1 SC between shells to anchor.)

When finished, sew a button at one end to secure it to the head.

Friday, October 12, 2012

Sweet Hat with Bow


New pattern for sale on Etsy & Craftsy!  This pattern is easy to follow and produces SUCH a cute result!  Check it out!

Friday, October 5, 2012

Easy Fingerless Gloves

 Easy Fingerless Gloves

Materials:
I Hook
Worsted Weight Yarn (I used Heather Grey)

Ch 32.
R1: DC in 3rd ch from hook and each st across. 
R2-R14: Ch 3, turn.  Skip 1st st.  DC in each st across and in top of turning ch.  Tie off at the end of the final row (R14).

To assemble:
Use a yarn needle and yarn.  Sew up the first 5 stitches.  Skip next 4-5 stitches (depending on how big you want your thumb hole to be), then continue to sew to end of glove. 

Wednesday, October 3, 2012

Triangle Bunting


So, I'm awful...  No posts for the month of September?!  Crazy! Plus, I'm not crazy about the quality of that picture.  My good camera has been MIA since our last move, so I'm having to make do with my iPhone camera.  Not great.  :/

Life has been hectic and exhausting lately.  I've had so many things going on that I can barely keep it all straight!  Luckily for me, my family is amazing and they take good care of this mama.  What a great hubby and kids I have!

Triangle Bunting (Shown in Candy Corn Colors)

Materials: 
Yarn of your choice and the recommended hook for that yarn - I used a variety of different yarns and an I hook.

***Colors changes are up to you.  I made 2 rounds of each color***
Ch 4.  Join with sl st to form ring.
R1: Sl st in center of ring.  Ch 3.  2 DC in ring.  Ch 2.  3 DC in ring.  Ch 2.  3 DC in ring.  Ch 2.  Join in top of ch 3.
R2: Ch 3, turn.  2 DC in sp.  Ch 2.  3 DC in same space.  Ch 2.  3 DC, ch 2, 3 DC in next sp.  Ch 2.  3 DC, ch 2, 3 DC in remaining sp.  Ch 2.  Join in top of ch 3.
R3 and beyond: Sl st in space.  Ch 3, turn.  2 DC in sp.  Ch 2.  3 DC, ch 2, 3 DC in corner space.  Ch 2.  3 DC in next space (along side of triangle).  Continue in like manner - 3 DC, ch 2, 3 DC in each corner of triangle, and using 3 DC, ch 2 along the side space of the triangle.

Join the triangles in any way you wish to create a bunting.  

Here's how I did it:
Ch 10.  Join 1st triangle with SC in first st.  SC along each st across triangle.  Ch 5 between each triangle, then join the next in the same way.  After joining all triangles and stitching across, ch 12.  Turn work.  SC in 2nd st from hook and each st across, adding a picot stitch above each space of the triangles (this means after you make a SC, ch 3 and sl st in same st).

Tuesday, August 28, 2012

Hood Hat


This hat is SO easy, and produces a really cute result!  The girls absolutely love them!  In fact, I made one for Lili and Meili fell in love with it, so I had to make another right away!  Check out those pretty girls!  ;)

Super Duper Easy Hood Hat

Materials:
I Hook
Caron Simply Soft Yarn in your choice of colors (I used Strawberry for one hat, and Passion for another)
and/or
Red Heart Soft Yarn (not shown, but could be used)
and/or
Red Heart Shimmer (I used Pewter in both hats)

Hold 2 strands of yarn together throughout pattern.
Ch 72
R1: Dc in 3rd ch from hook.  Sc in next st.  *1 dc.  1 sc*  Repeat to end of row.  Turn.
R2-20: Ch 2.  *1 dc.  1 sc*  Repeat to end of row.

Stop here to fit a toddler.  Continue to 24 rows for child sizes, 26-28 rows for teen or adult sizes.

At the end of your last row, do not cut your yarn!  Fold your work in half, putting the shorter ends together.  Using your yarn, sc through both sides to attach the sides together, making the hood.

For the braids:

Measure out about 20 strands of yarn to be TWICE the length you want your braids to be.  Using a large crochet hook (or your fingers if you are well coordinated!) and pull the strands through the corner stitch at the bottom of the hood.  The middle of all the strands should be where the crochet stitch is, and you should half equal amounts of yarn on either side.  Put the ends together and braid.  Wrap yarn around the bottom of your braid and tie a knot to hold together.  Trim the ends to make them even if needed.  Repeat on the other side. 

Tuesday, August 21, 2012

Striped Pillow Cover


This is a fun pillow cover to make, and can easily be made to fit into any decor.  You can change up the colors however you like, and there are options to make it easy to remove from the pillow and throw in the wash.

Materials:
Your choice of yarn - Seriously, you could make this with just about any kind of yarn.  I used Red Heart Super Saver yarn in Aruba and Grey Heather, because I  know how rough my kids are on our couch pillows. ;)

Hook size recommended for the yarn you choose.  In my case, I hook.

Yarn Needle.

*Keep in mind that not all pillows are the same size.  This was made for a standard decor pillow, measuring 18"x18".  You may want to measure your pillows and go from there.  I tend to crochet fairly loosely, so you may want to make more/less chains in the beginning depending on how big of a pillow cover you want to make.

The pattern is written for 2 colors, but you can change your rows any way you like to match your style.

Begin with color 1 (Aruba)
Ch 52. 
R1:  Dc in 3rd ch from hook and each ch to end.  3 dc in last ch.  Dc in each ch again, working back to first ch from other side of ch.  Join with sl st.
R2: Ch 2.  Dc in each stitch around.  Join with sl st.  

Optional: Change to color 2 (Grey Heather).

R3-R28:  Repeat R2, change colors when you like.

I changed colors every 2 rounds, so I would have 2 rounds of each color, creating a medium-thick stripe.

At the end of your rounds, place pillow in the cover.  You can either A) sew up the seam, or B) add buttons to one side and button the seams together, or C) add a zipper closure.

Bow Front:
You will first make one thick panel (shown in Aruba), then you will make a small panel (shown in Grey Heather) to wrap around the bigger panel.  

Thick panel:
(Aruba) 
Ch 22.
R1: Dc in 3rd ch from hook, and each ch to end.  
R2-R28: Ch 2.  Dc in each st across.  
Tie off, hide ends.

Small Panel:
(Grey Heather)
Ch 10.
R1:  Dc in 3rd ch from hook and each ch across.
R2-R6:  Ch 2.  Dc in each st across.
At the end of R6, wrap the small panel around the larger panel.  This is like the center of the bow.  When it is wrapped, stitch up the ends up the small panel.

Sew ends of large panel onto cover.

Friday, August 17, 2012

Hexagon Squares

These are going to make a really fun afghan soon!  I chose a yarn that has a really lightweight texture because I wanted this to be a really airy blanket.  When my "squares" are finished and assembled, I'll post another picture!


Materials:
G Hook
Bernat Softee yarn in Soft Peach, Antique White, Mint, and Pale Blue - Amounts will vary depending on how many squares you make/size of blanket you want.

Notes: I alternated the 3 middle colors for each square for the sake of interest, but kept the borders white and plan to assemble them all with white.  The color options are up to you, so I didn't put in the names of the colors, but will just refer to the colors as Color 1, 2, 3 and 4.  You get to choose what order to put them in.  ;)  The pattern is worked from the center out, if that helps with your choices.  I would recommend tying a small knot at the end of each round to help the yarn stay in place, as I am always afraid that changing yarns a lot will make a blanket fall apart!

Begin with Color 1:
Ch 4.  Join to form a ring.
R1: Ch 3 (counts as dc).  11 dc in center of ring.  Join with sl st in top of ch 3. (12 st)

Drop Color 1, join Color 2:
R2: Ch 3 (counts as dc).  1 dc in same st.  2 dc in each st around.  Join with sl st in top of ch 3.  (24 st)

Drop Color 2, join Color 3:
R3: Insert hook between posts of next 2 st's.  Ch 3 (counts as dc).  2 dc in same st.  Ch 1.  Skip next 2 posts.  *3 dc in next sp.  Ch 1*  Repeat to end of round.  Join with sl st in top of ch 3.  

Drop color 3, Join Color 4 (I used white for these rounds on each square):
R4: Join between 2 clusters of 3dc from previous round.  Ch 4.  Skip 3dc cluster.  *sc in sp between clusters.  Ch 3*  Repeat around.  Join with sl st in 2nd ch of ch 4.

R5: Insert hook in sp under ch's from R4.  Sl st.  Ch 3.  2 dc, ch 2, 3 dc in same sp.  3 dc in next sp.  *3 dc, ch 2, 3 dc in next sp.  3 dc in next sp*  Repeat to end of round.  Join with sl st in top of ch 3.  Tie off and hide ends. 

Tuesday, August 14, 2012

Back To School: Apple Covers for Lunchboxes


These are great for lunchboxes and backpacks!  I have homeschooled my kids for about 4 years now, but I am sending them to a charter school this year.  Uniforms and sack lunches!  Yay!  (Haha)  Since kids tend to be rough with their backpacks, they often end up with bruised fruit at lunch.  This cuts down on that significantly!  Plus, it's cute!  ;)  I made these up in about 15 minutes - and that includes writing the pattern and getting my daughter a drink.  SUPER fast!

Materials:
Cotton Yarn
H Hook
Yarn Needle

Magic Circle (or ch 3 and join to make circle)
R1: Ch 2 (counts as first sc).  7 sc in center (total of 8 sc). Join with sl st.
R2: Ch 2 (counts as first sc).  1 sc in same st.  2 sc in each st around.  Join with sl st.
R3: Ch 4 (counts as dc, ch 1).  Dc in same st.  *Sk 1 st.  Dc, ch1, dc in next st.*  Repeat to end.  Join with sl st in 3rd ch of ch 4.
R4: Sl st in next sp.  Ch 3.  2 dc in same sp.  3 dc in each space around (3dc cluster).  Join with sl st in top of ch 3.
R5: Sl st in next st (center st of a 3dc cluster).  Ch 4 (counts as dc, ch 1).  Dc in same st. *Sk 2 st.  Dc, ch 1, dc in next st.*  Repeat to end.  Join with sl st in 3rd ch of ch 4.
R6-R7:  Repeat R4 & R5.
R8:  Ch 2.  Sc in each st.  Do not join.  Tie off and hide ends.

Using blunt yarn needle and long piece of yarn, weave yarn under both loops of sc stitches, beginning with needle going from outside to inside of apple cover on first stitch, then inside to outside on next stitch.  Repeat this all the way around.  Leave a long tail to use to tie up when an apple is inside. 

Friday, July 13, 2012

Fluffy Duster

My house accumulates an impressive amount of dust.  We dust every day.  Every.  Single.  Day.

So, why not make the job a little bit easier, faster, and more fun for my awesome helpers!  (Thanks, kids!)


Can you see the dust?
Finished dusting the shelf - Now, throw it in the washer!

Fluffy Duster

Materials:
Pipsqueak Yarn by Bernat (I used Funny Bunny Print)
I Hook
Yarn needle

Chain 4 (This makes 1 ch + ch 3, which will count as a DC)
R1: Make 7 DC in first ch made.  Join with sl st in top of ch 3.  (8 DC)
R2: Ch 3.  1 DC in same st.  2 DC in each st around.  Join with sl st in top of ch 3. (16 DC)
R3: Ch 3.  1 DC in same st.  1 DC in next st.  *2 DC in next st.  1 DC in next st.*  Repeat around.  Join with sl st in top of ch 3.  (24 DC)  Do not cut yarn.

Strap:
Row1: Ch 3.  1 DC in each of next 4 st.  Ch 3, turn.
Row2-5: 1 DC in each of next 4 st.  Ch 3, turn.
Attach end of strap directly on the other side of the circle you've made with yarn needle.

Thursday, June 14, 2012

Flag Rug

Happy Flag Day!  And...  Happy Anniversary to the greatest husband a wife could ask for!

Also, I just want to express my gratitude for everyone who puts up a flag on our anniversary.  It's good to know that the whole country is rooting for us and supports our family and marriage.  Thanks, America!  ;)

Ha ha, but seriously...  Words could never properly convey the love and appreciation I have for my husband.  There is such comfort in being able to be myself with him, 100% of the time.  I can be silly, angry, sad, sappy, tired, cranky, goofy, hyper, happy, or any number of things and I know he will stick with me with every ounce of love he's had for me since the day we were married.  That kind of loyalty is a rare gem. 

In honor of the occasion, I thought about crocheting a gigantic blanket with my husband's face on it... 

Ha ha, no, I really didn't.  ;) 

I actually wanted to honor Flag Day. 


Flag Rug

Materials:  Lion Brand Hometown USA Yarn in Cincinnati Red (2 skeins), New York White (2 skeins), and San Diego Navy (1 skein) - or other Super Bulky Weight Yarn
N Hook

Begin with Red.
Ch 53 (or to desired length).
DC in 4th ch from hook, and each stitch across.  Turn.
Switch to White.
Ch 3.  DC in each stitch across.  Turn.
Switch to Red.
Ch 3.  DC in each stitch across.  Turn.

Continue in a similar fashion, DC'ing across each row, but switching colors between red and white to create the striped effect.  Continue this until you have the desired height of the rug, taking into account the border.

Border:
Use Blue.
Beginning in any corner, attach yarn and chain 3.  4 DC in same corner stitch.  DC in each stitch (make 2 DC in each stitch when working along the sides of the rug, where the stitches are tall).  Make 5 DC stitches in each corner stitch.  Join with sl st to top of ch 3.


I am thinking of embellishing this with a star motif.  If I do (if I have time!) I'll post the pattern for that as well!

Tuesday, May 22, 2012

Soap Scrubbie


I made this for my oldest son.  He has Keratosis Pilaris on his arms and face (little flesh colored bumps) and was told to exfoliate them when he showers.  I figured this would help him out.  :)  It's just a cotton pouch that you can open up, put a bar of soap in and lather up.

Soap Scrubbie

Materials:
100% Cotton Yarn (I used Lily Sugar & Creme)
H Hook

Ch 9
R1: Sc in 2nd ch from hook and in each chain across to last stitch.  3 sc in last chain.  You will now work in the other side of the foundation chain.  Sc in each ch to last stitch.  3 sc in last ch.  Join with sl st.
R2: Ch 2.  *1 sc in each stitch until you reach the 2nd of the 3 corner stitches.  3 sc in 2nd corner stitch.*  Repeat on other side.  1 sc.  Join with sl st.  
R3 - R14: Ch 2.  1 sc in each stitch asround.  Join with sl st. 

At the end of R14, tie off and hide ends.  

Make a long strand of chains (I made 52 chains) to use to tie the bag closed.  Weave the strand between the stitches of the top row in any fashion you desire.  I weaved between each stitch.


Friday, May 18, 2012

Striped Blanket


We have a new member of our family!  My husband suggested that since I made baby blankets for all the other kids, I may as well make one for our new baby as well.  ;)  I actually have a TON of Red Heart Super Saver Yarn that I am dying to get rid of, but I just can't fathom throwing away yarn.   Some of it was given to me by friends who don't knit or crochet, but had used little bits of yarn for other craft projects, and some of it was leftovers from making about a thousand (okay, maybe not a thousand, but it sure felt that way!) pairs of legwarmers around the Christmas season.  This striped blanket is small, as it was made to fit inside my puppy's kennel with her - even though she sleeps on the couch most of the time.  However, you could easily adapt the pattern to make it as large or small as you like.

Striped Blanket

Materials:
*4 skeins of Red Heart Super Saver Yarn: I used 1 each of Orchid (Color A), Melonberry (Color B), Pink Tones (Color C), and Perfect Pink (Color D)
*H Hook

Begin with Color A
Chain 103. (Or make as many chains as you'd like the blanket to be long.)
R1: DC in 4th ch from hook, and in each stitch across.  Join Color B and drop Color A.  
R2:  Ch 3 with Color B.  DC in each stitch across.  Join Color C and drop Color B.
R3:  Ch 3 with Color C.  DC in each stitch across.  Join Color D and drop Color C.
R4:  Ch 3 with Color D.  DC in each stitch across.  Turn.
R5:  Ch 3 with Color D.  DC in each stitch across.  Join Color C and drop Color D.
R6:  Ch 3 with Color C.  DC in each stitch across.  Join Color B and drop Color C.
R7:  Ch 3 with Color B.  DC in each stitch across.  Join Color A and drop Color B.
R8:  Ch 3 with Color A.  DC in each stitch across.  Turn.
R9:  Ch 3 with Color A.  DC in each stitch across.  Join Color B and drop Color A.
R10-25:  Repeat R2- R9.  (You can continue repeating rows to make the blanket as wide as you like)
R26-31: Repeat R2-R7
R32: Ch 3 with Color A.  DC in each stitch across.  Tie off and hide ends.

As a border, Join Color A in any corner.  Ch 2.  3 SC in corner stitch.  SC around entire blanket making 2 SC stitch in the length of each DC (on what would be the top and bottom of blanket) and one SC in each DC along sides, and 3 SC in each corner stitch.

If you'd like a thicker border, you can SC around the entire blanket again, placing your 3 corner stitches in the center corner stitch of the previous row.

Friday, May 11, 2012

Super Fast & Easy Doily


Another great project that works up quickly.  If you're looking for a more traditional Mother's Day gift, but need it fast, here you go!

Super Fast & Easy Doily

Materials:
100% Cotton Yarn (I used Lily Sugar n Creme in White)
G Hook

Ch 4.  Join with sl st to form ring.
R1: Ch 2.  10 sc in ring.  Join with sl st.
R2: Ch 3.  2 dc in each stitch around.  Join with sl st.  
R3: Ch 6.  Skip 1 stitch.  *1 sc in next stitch.  Ch 5.  Skip next stitch.*  Repeat around.  Join with sl st in first ch made.
R4: Ch 2.  *4 sc in next ch sp.  Ch 1.*  Repeat around.  Join with sl st in 1st sc made.
R5: Sl st in first 3 sc.  Ch 3.  4 dc in same stitch.  1 sc in next ch sp.  *Skip 2 st.  5 dc in next stitch.  1 sc in next ch sp.*  Repeat around.  Join with sl st in top of ch 3.  Tie off and weave in ends.  Block if desired.

Super Fast & Easy Flower Headband


With Mother's Day being this weekend, I thought people might need a last minute gift idea.  This is a super fun headband that took me all of 10 minutes to whip up...  and that is because I was wrestling with my dog to get my yarn back!

Super Fast & Easy Flower Headband

Materials:
100 % Cotton Yarn (I used Sugar n Creme in White)
G Hook

Ch 4.  Join with sl st to form ring.
R1: Ch 2.  10 sc in center of ring. Join with sl st in top of first sc made.  (You can also make 12 sc if you'd like a 6-petal flower)
R2: Ch 2.  *(1 sc, 1 dc, 1 tc) in stitch.  (1 tc, 1 dc, 1 sc) in next stitch.*  Forms one petal of flower.  Repeat this around the entire flower.  Join with sl st in top of first sc made.  Do not tie off or cut the yarn yet!

To create the strands that tie around the head:
While still attached to the flower, begin a series of chains to create the first strand.  I made around 100 chains, but to be honest, this is the part where my sweet puppy tried to take off with my yarn!  I was a bit distracted.  When you get to your desired length, make one more chain.  Snip the end of your yarn, pull your hook and make this a knot.

For the other strand, attach the yarn between petals on the other side.   For the 5 petal flower, I just attached the yarn 2 petals away.  Make another series of chains.  I made this strand shorter than the other because I know I will be wearing the flower a bit to the side and not right on the top of my head.  When you get to your desired length, make one more chain.  Snip the end of your yarn, pull your hook and make this a knot.

Simple as that!  

Monday, April 30, 2012

Boo Boo Bags

The weather is warming up!  This is always exciting for my kids, because that means more time outside.  This weekend, our family participated in our city's "Clean Up, Green Up" event.  We volunteered our Saturday to get out in the community with our friends and neighbors and help to clean up the city.  This is a pretty big event where we live, and involves a live band and a barbecue lunch in the park. 

Which brings me to Boo Boo Bags.  :)

My kids are adventurous.  They are daredevils.  They are absolutely fearless.  They are also human. Our park has a giant pirate ship (since all kids turn a playground into a pirate ship anyway) that the kids can climb all over.  As fun as this can be, it does occasionally involve injury.  Most can be resolved with a hug and a kiss.  Sometimes a band-aid is needed even when there is no blood, and sometimes you get a good bump that requires a bag of ice.


Thus was born, the Boo Boo Bag!  A ziploc bag full of ice is too cold.  We always wrap it up in a little towel of some sort before applying it to anyone's skin.  This usually results in a wet towel, a hole in the plastic bag, the towel getting lost, or any combination of these.  These work up fast-I made two while watching a movie with my husband.  I filled 2 ziploc bags with ice, put them in the Boo Boo Bags and put the whole thing in the freezer.  That way, we don't even have to wait for the bags to get cold from the ice.  They're just ready to go!


Boo Boo Bags

Materials:
Lily Sugar 'n Cream Cotton Yarn in your choice of colors.  I used White and Countryside Ombre
H Hook

Chain 21.
R1: Skip 1st ch.  SC in each chain across.Ch 1, turn.
R2-R35: SC in each stitch across.  Ch 1, turn.
R36: SC in each stitch across.  Tie off and hide ends.

Assembly Instructions:
You can use the same color for assembly, or use another color for some fun.  If using another color, attach yarn at the point where you ended your last row.  SC across to end of row.  Tie off, hide ends.

Fold bottom of bag up, about 6 rows from the top.  Fold top over.  Attach yarn into one of the corners.  3 SC in corner.  SC across each side of the bag (going through each layer-2 layers at the bottom of the bag, 3 layers at the top where the flap is folded over), making 3 SC stitches in each corner.  Join with slip stitch in first SC made.  Tie off, hide ends.

Fill a ziploc bag full of ice.  Place it inside the Boo Boo Bag and keep the whole thing in the freezer for the next time you need it.  This would also be great for sunburns!

Monday, October 10, 2011

Leg Warmers


Super cute legwarmers with shell edging detail!  These are so fun to wear and they are WARM!  Ha ha!  The weather has been a little kooky lately.  Just 2 weeks ago we were running the A/C and then one morning we just woke up and needed the heater on!  No in-between (otherwise known as "autumn" or "fall"), straight from hot to cold.  Now, YOU need a pair of legwarmers!!

This project didn't take me long at all.  You could easily whip these up while watching a movie... like I did.  ;)

Check it out! We've been featured on Social Salutations: Friday, I'm in Love!


Super Cute, Fun & Easy Leg Warmers

Materials needed:
*H hook
*Red Heart Super Saver yarn in Coffee
*Coordinating buttons - I used 6, 3 on each legwarmer.  This could be cute with one button in each shell, going all the way down...  or even without buttons!  It's up to you!

Stitches Used:
ch=chain
DC=double crochet
SC=single crochet
Sl st=slip stitch

Ch 47
R1: DC in 3rd ch from hook and each ch across.  Ch 2, turn.
R2-22: DC in each stitch across.  Ch 2, turn.
R23: DC in each stitch across.  Turn work.
R24: 5 DC in 2nd stitch (shell).  *Skip 2 stitches, SC, Skip 1 stitch, 5 DC in stitch (shell).* Repeat *-* to end of last shell. (9 shells made).  Sl st in last stitch.  Tie off & weave in ends.

Repeat to make second leg warmer.