Background

Showing posts with label Crochet. Show all posts

Tuesday, November 13, 2012

Hooded Cowl

Hooded Cowl

Materials:
Lion Brand Wool-Ease Thick & Quick Yarn in Barley
N Hook

*Note on adjustments:  This pattern was created for my 3 year old daughter.  It is easily adaptable, though!  1) Simply begin with more chains to make larger (or less chains to make smaller), 2) when beginning the hood you'll need to figure out how big to make the opening for the size you're looking for (you'll begin in the same stitch, but will end in a different stitch than is written), and 3) add more (or less) rows to the hood.

Keep all stitches slightly loose to allow the hood to move easier while wearing.  Thick yarn like this can easily be pulled too tight and just be stiff.

Ch 35, loosely.  Join with sl st in first ch made.
R1-R5: Ch 2.  DC in each st around.  Join in top of first DC made.
R6: Ch 2.  DC in each of the next 25 st.
R7-R16: Ch 2, turn.  Skip first st.  DC in each st to end of last row, placing final DC in top of turning chain.
 At the end of R16, you have a couple of options.  You can tie off the ends here, then use a yarn needle and a long piece of yarn and sew along the top edge of R16 to create the hood.  OR, you can do what I did:  Ch 1, turn.  Put ends of top of hood together and either sl st or SC across the entire work.  Then, tie off you yarn.  Turn the entire project inside out to hide that seam and you're done.  :)

Friday, November 9, 2012

Big Bow Headband

Big Bow Headband

This is going to be a fun hair accessory for girls to wear to all of those holiday gatherings!

Materials:
Caron Simply Soft yarn in your choice of color (I used Autumn Red)
H Hook

*Note: This pattern was written to fit my petite 3 year old.  The pattern is adjustable, though!  To make larger or smaller, just begin the band with enough chains to fit your child's head snugly.  Once you start to stitch into the chains, they will stretch slightly-plus, as the headband is worn, it is likely that it will stretch out a bit and you want it to stay fairly snug on the child's head.  You can also consider purchasing some elastic (as in the elastic used for waistbands in sewing) and sew that inside the headband. 

Band:
Option 1:
Ch 68 (or to fit circumference of head).  Join with sl st in 1st ch made. Ch 2.  DC in each stitch around.  Join in top of 1st DC made.

Option 2-a little more snug:
Ch 68 (or to fit circumference of head).  DC in 3rd ch from hook, and each ch across.  Tie off yarn.  With this option, you should attach a button or some elastic to hold it in place on the head.

Bow:
Ch 30. Join with sl st in first ch made.  
R1-R4:  Ch 2.  DC in each st around.  Join with sl st in top of first st.
 At the end of R4, tie off yarn.

Center of Bow:
Ch 10.  DC in 2nd ch from hook and each st across.  

Putting it all together:
Lay "Bow" on top of band where you would like to attach it.  Take "Center" and wrap it around the bow and the band, then sew the ends together on the inside (where it will lay against the head).  I recommend using a few stitches to attach the bow directly to the band as well, otherwise the bow will slide freely along the band.

Tuesday, November 6, 2012

Star & Wreath Ornaments

Star and Wreath Ornaments

Star Ornament

Materials:
H Hook
Cotton Yarn (I used Peaches & Cream in Ecru)
Optional Materials:
Wooden Button
Thick Ribbon
Sewing Needle & Thread (to sew on button)
Glue Gun (to ensure that threads don't come loose after sewing)

Ch 5.  Join in first ch made to form a ring.  
R1: Ch 3 (counts as DC).  2 DC in ring.  Ch 5.  *3 DC in ring.  Ch 5.*  Repeat 3 more times.  Join in top of first ch 3.  You should have a total of 5 chain spaces.
R2: Ch 1.  * SC in first st.  Sk 1 st.  SC in next st.  In ch sp: 3 SC.  Ch 2.  SC in 3rd SC made to create picot.  2 SC*  Repeat around to create star.  Join with sl st in first st made.  
Optional Decorating:  Cut a length of ribbon and fold in half.  Place the cut ends underneath a point of the star.  Place button on top of the star and sew through all layers to attach button and ribbon to the star.  Use a dot of hot glue on the ends of thread after sewing to ensure that your knots don't come undone.

Wreath Ornament

Materials:
H Hook
Cotton Yarn (I used Peaches & Cream in Forest Green)

Optional Materials:
Buttons
Thin ribbon
Glue Gun

Ch 10.  Join to form ring.
R1: Ch 1.  15 SC around chains.  Join in top of first SC made.
R2: Ch 2.  Working in FRONT LOOPS ONLY:  3 DC in each st around.  Join in first st made.  Ch 1.  Sl st around the post of ch 2 (you are working toward the base of this round).  Ch 1.  Sl st into bottom of the first DC made and drop yarn from hook.  Turn the entire piece over.  The side you are now looking at is the front.  
R3: Insert hook through the work in the place closest to where you dropped the yarn from the hook.  Pick up yarn and pull it through to the front.  Turn work 180 degrees (upside down, but keep the front facing you).  Working in FRONT LOOPS ONLY (these are what was the back loops that you did not work in previously):  3 SC in each st.  Join in top of first SC made.  Tie off and hide ends.

Optional Decorating:  Create a bow out of the thin ribbon.  Use glue to tack down the ends of the bow.  You can also embellish with small buttons, glued to the bow.

I also tied yarn to the top of the wreath to create a loop to hang from the tree.

Friday, November 2, 2012

Autumn Scarf


Autumn Scarf

Materials:
H Hook
Vanna's Choice Yarn in Autumn Print

Ch a multiple of 4.

R1: [2 TC, ch2, 1 DC] in 6th ch from hook.  *Skip next 3 ch.  [2 TC, ch2, 1 DC] in next ch.*  Repeat to last 2 st.  Skip next ch.  1 TC in final ch.  Turn.

R2: Ch 3 (counts as first DC).  *[2 TC, ch2, 1 DC] in next ch 2 sp.*  Repeat across.  1 TC in top of turning chain.

Repeat R2 for pattern.

Consider adding a fringe or a fun border to this scarf!

Tuesday, October 30, 2012

Child's Apron

 
Here is a fun child's apron that you can give to your little one as you prepare for Thanksgiving!  Every child loves to be included when a family meal is being prepared.  My kids LOVE to stand near me in the kitchen while I cook because they know they will get a chance to help out.  This apron is great because they can use it in their play kitchen, or in the real kitchen, and then it can get thrown in the washer when it gets dirty.  Here's to a great kickoff of the holiday season!

Materials:
H Hook
Caron Simply Soft Yarn (I used Strawberry for the apron and Off White for the ruffles)

Ch 42.
R1: DC in 3rd ch from hook and each ch across.  
R2-R18: Ch 2, turn.  DC in each st across.
R19-R22:  Ch 2, turn.  2 DCdec.  DC in each st across to last 4 st.  2 DCdec.  
R23-R24:  Ch 2, turn.  DC in each st across.  Do not cut yarn

Strap:
R1: Ch 2, turn.  DC in each of next 5 st.
R2-R15 (or more rows if you need to make hole for head larger):  Ch 2, turn.  DC in each st across.
At the end of final row, attach yarn to other side of apron to create hole for neck.  You can attach by using sl st, or cut and tie off yarn and sew with yarn needle.

Ties (make 2, attach to sides of aprons where first decreases started)
Ch 7.  DC in 3rd ch from hook and each st across.  
R2-R32:  Ch 2, turn.  DC in each st across. Tie off and hide ends.

Pocket:
Ch 32.  
R1:  DC in 3rd ch from hook and each ch across.  
R2-R6:  Ch 2, turn.   DC in each st across.
R7:  Ch 2, turn.  DC in each st across.  At end of row, SC around the other 3 sides of the pocket.  Tie off yarn, leaving a tail long enough to sew the pocket onto the apron.

To add ruffles (Optional):
SC around the entire apron with same color you used for apron.  Switch colors (if desired) and use 3 DC st's in each SC around entire apron.


Friday, October 26, 2012

Star Flower Applique

 Super Easy Star Flower Applique

Magic Circle (or ch 4, join)
10 SC in ring.  Join with sl st.
-*HDC, DC, TC in next st.  Ch 3, sl st in top of TC (picot).  TC, DC, HDC in next st.*  Repeat to end, creating 5 "petals" and then join with a sl st.  Tie off and hide ends. 

Tuesday, October 23, 2012

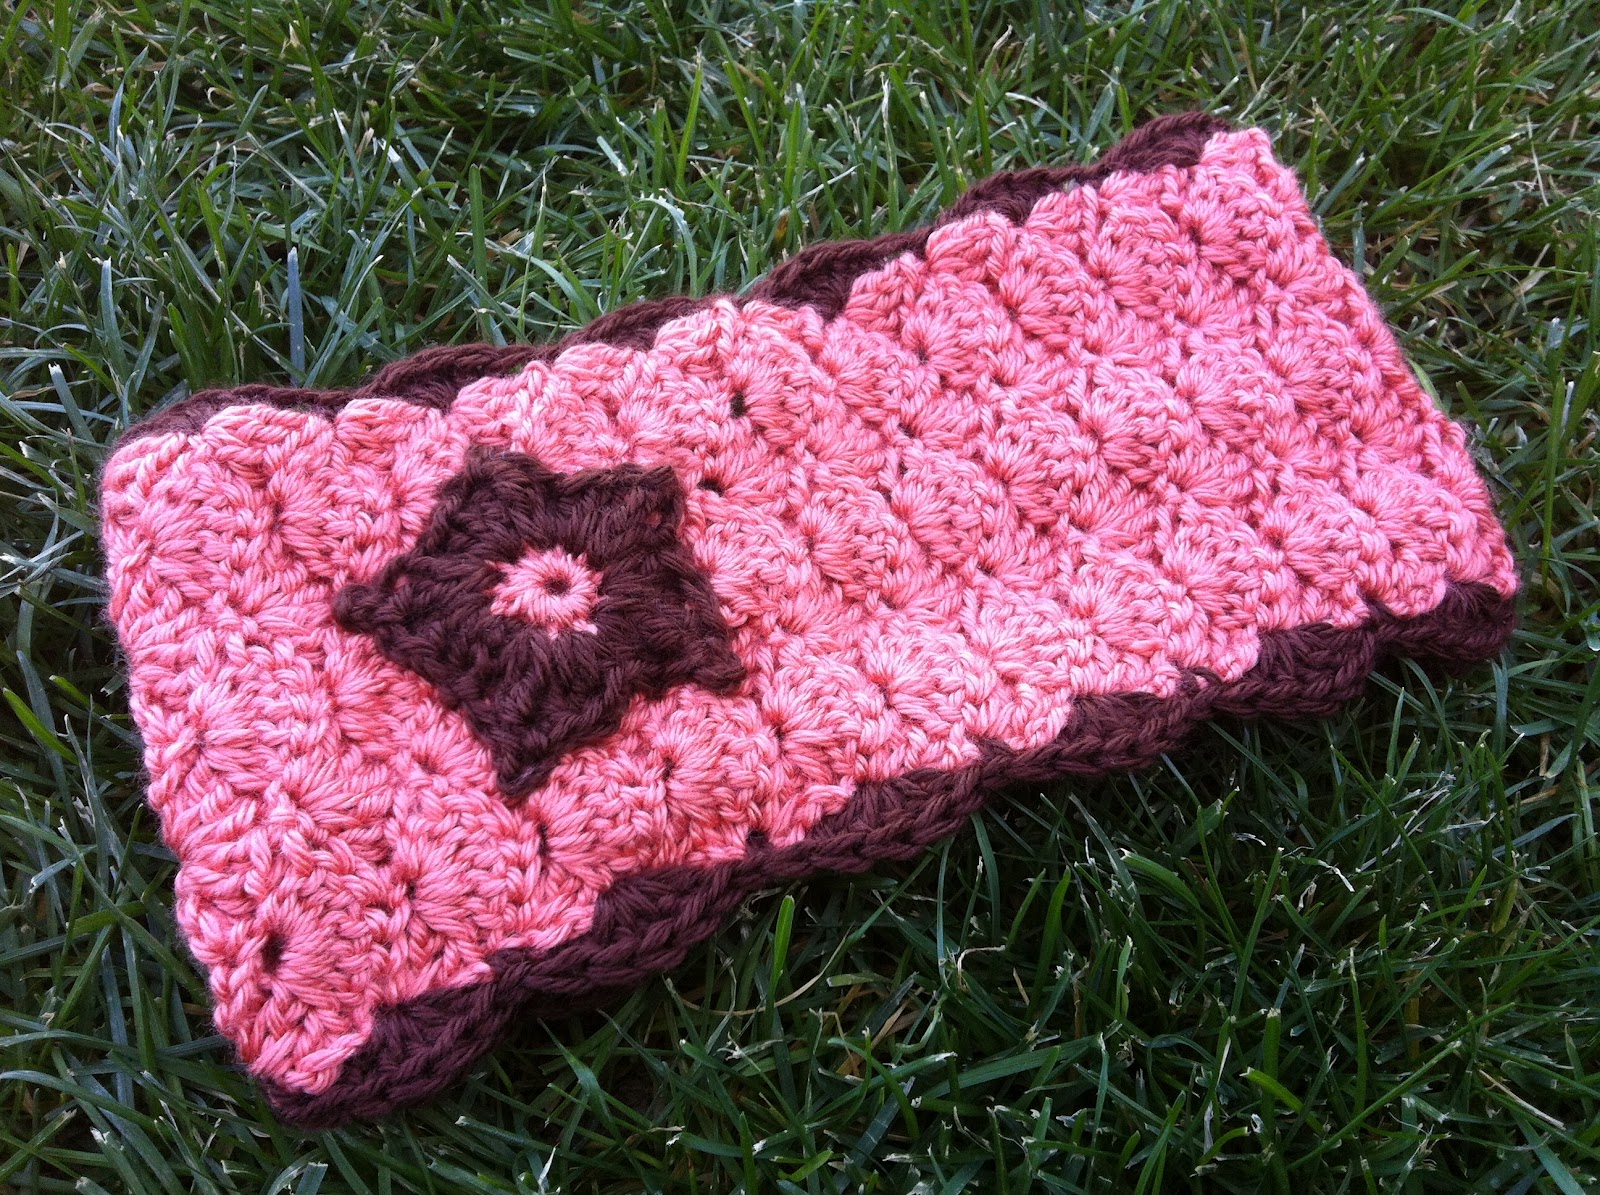
Shell Headband Earwarmer


The star applique will be in an upcoming post.  
 
Materials:
I Hook
Caron Simply Soft Yarn (I used Persimmon and Chocolate)
Button
Need & Thread (to attach button)

Ch 14.  
R1: SC in 2nd ch from hook.  Sk 2 st.  5 DC in next ch.  Sk 2 st.  1 SC.  Sk 2 st.  5 DC in next ch. Sk 2 st.  SC in final ch.  (2 shells created)
R2: Ch 2 (counts as SC).  4 DC in same st.  *Sk 2 st.  5 DC in next st.  Sk 2 st.  1 SC.* Repeat to end.  (3 shells)
R3: Ch 3 (counts as DC).  2 DC in same st (Half shell).  Sk 2 st.  1 SC.  Sk 2 st.  5 DC.  Sk 2 st.  1 SC.  Sk 2 st.  5 DC.  Sk 2 st.  1 SC.  Sk 2 st.  3 DC.  (Half shell).
R4-R38:  Repeat R2 and R3 for pattern.
R39: Ch 1.  SC3tog.  Sk 2 st.  5 DC.  Sk 2 st.  1 SC.  Sk 2 st.  5 DC.  Sk 2 st.  1 SC.  SC3tog in next 2 st and top of turning ch.  Ch 1 to secure.  

Border:
Join yarn in SC in the middle of final row, between shells.  Continue the fan pattern used in headband (using 5 DC's to create shell and using 1 SC between shells to anchor.)

When finished, sew a button at one end to secure it to the head.

Friday, October 12, 2012

Sweet Hat with Bow


New pattern for sale on Etsy & Craftsy!  This pattern is easy to follow and produces SUCH a cute result!  Check it out!

Tuesday, October 9, 2012

Mitered Square Dishcloths


These dishcloths are super easy to make and have a big impact.  The texture makes them fun and interesting.  I've written the instructions to make them using 2 colors of yarn, but you could easily make them with only one color, or with several colors.  It's all up to you!

Materials:
I Hook
Cotton Yarn (I used Peaches & Creme in a variety of colors)

Special Stitches:
SC3tog= Single crochet 3 together.  Insert hook into first st and pull up a loop (2 loops on hook).  Insert hook into next stitch and pull up a loop (3 loops on hook).  Insert hook into next stitch and pull up a loop (4 loops on hook).  Yarn over and pull through all 4 loops. 

Created using 2 colors, Color A and Color B.  These will be referred to as A and B throughout the pattern.

Begin with A.
Ch 35.
R1: SC in 2nd ch from hook and next 14 st.  SC3tog.  SC to end of row.
R2: Ch 1, turn.  SC in each st until you reach the stitch just before the one created when you SC3tog.  SC3tog (having the previous SC3tog be the center stitch of those 3).  SC to end of row.  In the final stitch, drop A and pick up B when pulling through the last loop of your SC.
R3: This is the right side.  You will only work in the back loops when working the right side.  Ch 1, turn.  SC in each st until you reach the stitch just before the one created when you SC3tog.  SC3tog.  SC to end of row.
R4: This is the wrong side.  You will work in both loops when working the wrong side.  Ch 1, turn.  SC in each st until you reach the stitch just before the one created when you SC3tog.  SC3tog.  SC to end of row.  In the final stitch, drop B and pick up A when pulling through the last loop of your SC.

Continue pattern in like fashion.  In the final stitches of the square, you will SC3tog making them into one final stitch.   To create the border, you have two options:

Option 1 (continuing the color you end on to create the border): Ch 1.  3 SC in same stitch.  Continue using SC around the entire square, using 3 SC in each corner stitch.  Join with sl st in the top of the first SC made.  Tie off and hide ends. 

Friday, October 5, 2012

Easy Fingerless Gloves

 Easy Fingerless Gloves

Materials:
I Hook
Worsted Weight Yarn (I used Heather Grey)

Ch 32.
R1: DC in 3rd ch from hook and each st across. 
R2-R14: Ch 3, turn.  Skip 1st st.  DC in each st across and in top of turning ch.  Tie off at the end of the final row (R14).

To assemble:
Use a yarn needle and yarn.  Sew up the first 5 stitches.  Skip next 4-5 stitches (depending on how big you want your thumb hole to be), then continue to sew to end of glove. 

Wednesday, October 3, 2012

Triangle Bunting


So, I'm awful...  No posts for the month of September?!  Crazy! Plus, I'm not crazy about the quality of that picture.  My good camera has been MIA since our last move, so I'm having to make do with my iPhone camera.  Not great.  :/

Life has been hectic and exhausting lately.  I've had so many things going on that I can barely keep it all straight!  Luckily for me, my family is amazing and they take good care of this mama.  What a great hubby and kids I have!

Triangle Bunting (Shown in Candy Corn Colors)

Materials: 
Yarn of your choice and the recommended hook for that yarn - I used a variety of different yarns and an I hook.

***Colors changes are up to you.  I made 2 rounds of each color***
Ch 4.  Join with sl st to form ring.
R1: Sl st in center of ring.  Ch 3.  2 DC in ring.  Ch 2.  3 DC in ring.  Ch 2.  3 DC in ring.  Ch 2.  Join in top of ch 3.
R2: Ch 3, turn.  2 DC in sp.  Ch 2.  3 DC in same space.  Ch 2.  3 DC, ch 2, 3 DC in next sp.  Ch 2.  3 DC, ch 2, 3 DC in remaining sp.  Ch 2.  Join in top of ch 3.
R3 and beyond: Sl st in space.  Ch 3, turn.  2 DC in sp.  Ch 2.  3 DC, ch 2, 3 DC in corner space.  Ch 2.  3 DC in next space (along side of triangle).  Continue in like manner - 3 DC, ch 2, 3 DC in each corner of triangle, and using 3 DC, ch 2 along the side space of the triangle.

Join the triangles in any way you wish to create a bunting.  

Here's how I did it:
Ch 10.  Join 1st triangle with SC in first st.  SC along each st across triangle.  Ch 5 between each triangle, then join the next in the same way.  After joining all triangles and stitching across, ch 12.  Turn work.  SC in 2nd st from hook and each st across, adding a picot stitch above each space of the triangles (this means after you make a SC, ch 3 and sl st in same st).

Tuesday, August 28, 2012

Hood Hat


This hat is SO easy, and produces a really cute result!  The girls absolutely love them!  In fact, I made one for Lili and Meili fell in love with it, so I had to make another right away!  Check out those pretty girls!  ;)

Super Duper Easy Hood Hat

Materials:
I Hook
Caron Simply Soft Yarn in your choice of colors (I used Strawberry for one hat, and Passion for another)
and/or
Red Heart Soft Yarn (not shown, but could be used)
and/or
Red Heart Shimmer (I used Pewter in both hats)

Hold 2 strands of yarn together throughout pattern.
Ch 72
R1: Dc in 3rd ch from hook.  Sc in next st.  *1 dc.  1 sc*  Repeat to end of row.  Turn.
R2-20: Ch 2.  *1 dc.  1 sc*  Repeat to end of row.

Stop here to fit a toddler.  Continue to 24 rows for child sizes, 26-28 rows for teen or adult sizes.

At the end of your last row, do not cut your yarn!  Fold your work in half, putting the shorter ends together.  Using your yarn, sc through both sides to attach the sides together, making the hood.

For the braids:

Measure out about 20 strands of yarn to be TWICE the length you want your braids to be.  Using a large crochet hook (or your fingers if you are well coordinated!) and pull the strands through the corner stitch at the bottom of the hood.  The middle of all the strands should be where the crochet stitch is, and you should half equal amounts of yarn on either side.  Put the ends together and braid.  Wrap yarn around the bottom of your braid and tie a knot to hold together.  Trim the ends to make them even if needed.  Repeat on the other side. 

Tuesday, August 21, 2012

Striped Pillow Cover


This is a fun pillow cover to make, and can easily be made to fit into any decor.  You can change up the colors however you like, and there are options to make it easy to remove from the pillow and throw in the wash.

Materials:
Your choice of yarn - Seriously, you could make this with just about any kind of yarn.  I used Red Heart Super Saver yarn in Aruba and Grey Heather, because I  know how rough my kids are on our couch pillows. ;)

Hook size recommended for the yarn you choose.  In my case, I hook.

Yarn Needle.

*Keep in mind that not all pillows are the same size.  This was made for a standard decor pillow, measuring 18"x18".  You may want to measure your pillows and go from there.  I tend to crochet fairly loosely, so you may want to make more/less chains in the beginning depending on how big of a pillow cover you want to make.

The pattern is written for 2 colors, but you can change your rows any way you like to match your style.

Begin with color 1 (Aruba)
Ch 52. 
R1:  Dc in 3rd ch from hook and each ch to end.  3 dc in last ch.  Dc in each ch again, working back to first ch from other side of ch.  Join with sl st.
R2: Ch 2.  Dc in each stitch around.  Join with sl st.  

Optional: Change to color 2 (Grey Heather).

R3-R28:  Repeat R2, change colors when you like.

I changed colors every 2 rounds, so I would have 2 rounds of each color, creating a medium-thick stripe.

At the end of your rounds, place pillow in the cover.  You can either A) sew up the seam, or B) add buttons to one side and button the seams together, or C) add a zipper closure.

Bow Front:
You will first make one thick panel (shown in Aruba), then you will make a small panel (shown in Grey Heather) to wrap around the bigger panel.  

Thick panel:
(Aruba) 
Ch 22.
R1: Dc in 3rd ch from hook, and each ch to end.  
R2-R28: Ch 2.  Dc in each st across.  
Tie off, hide ends.

Small Panel:
(Grey Heather)
Ch 10.
R1:  Dc in 3rd ch from hook and each ch across.
R2-R6:  Ch 2.  Dc in each st across.
At the end of R6, wrap the small panel around the larger panel.  This is like the center of the bow.  When it is wrapped, stitch up the ends up the small panel.

Sew ends of large panel onto cover.

Friday, August 17, 2012

Hexagon Squares

These are going to make a really fun afghan soon!  I chose a yarn that has a really lightweight texture because I wanted this to be a really airy blanket.  When my "squares" are finished and assembled, I'll post another picture!


Materials:
G Hook
Bernat Softee yarn in Soft Peach, Antique White, Mint, and Pale Blue - Amounts will vary depending on how many squares you make/size of blanket you want.

Notes: I alternated the 3 middle colors for each square for the sake of interest, but kept the borders white and plan to assemble them all with white.  The color options are up to you, so I didn't put in the names of the colors, but will just refer to the colors as Color 1, 2, 3 and 4.  You get to choose what order to put them in.  ;)  The pattern is worked from the center out, if that helps with your choices.  I would recommend tying a small knot at the end of each round to help the yarn stay in place, as I am always afraid that changing yarns a lot will make a blanket fall apart!

Begin with Color 1:
Ch 4.  Join to form a ring.
R1: Ch 3 (counts as dc).  11 dc in center of ring.  Join with sl st in top of ch 3. (12 st)

Drop Color 1, join Color 2:
R2: Ch 3 (counts as dc).  1 dc in same st.  2 dc in each st around.  Join with sl st in top of ch 3.  (24 st)

Drop Color 2, join Color 3:
R3: Insert hook between posts of next 2 st's.  Ch 3 (counts as dc).  2 dc in same st.  Ch 1.  Skip next 2 posts.  *3 dc in next sp.  Ch 1*  Repeat to end of round.  Join with sl st in top of ch 3.  

Drop color 3, Join Color 4 (I used white for these rounds on each square):
R4: Join between 2 clusters of 3dc from previous round.  Ch 4.  Skip 3dc cluster.  *sc in sp between clusters.  Ch 3*  Repeat around.  Join with sl st in 2nd ch of ch 4.

R5: Insert hook in sp under ch's from R4.  Sl st.  Ch 3.  2 dc, ch 2, 3 dc in same sp.  3 dc in next sp.  *3 dc, ch 2, 3 dc in next sp.  3 dc in next sp*  Repeat to end of round.  Join with sl st in top of ch 3.  Tie off and hide ends. 

Tuesday, August 14, 2012

Back To School: Apple Covers for Lunchboxes


These are great for lunchboxes and backpacks!  I have homeschooled my kids for about 4 years now, but I am sending them to a charter school this year.  Uniforms and sack lunches!  Yay!  (Haha)  Since kids tend to be rough with their backpacks, they often end up with bruised fruit at lunch.  This cuts down on that significantly!  Plus, it's cute!  ;)  I made these up in about 15 minutes - and that includes writing the pattern and getting my daughter a drink.  SUPER fast!

Materials:
Cotton Yarn
H Hook
Yarn Needle

Magic Circle (or ch 3 and join to make circle)
R1: Ch 2 (counts as first sc).  7 sc in center (total of 8 sc). Join with sl st.
R2: Ch 2 (counts as first sc).  1 sc in same st.  2 sc in each st around.  Join with sl st.
R3: Ch 4 (counts as dc, ch 1).  Dc in same st.  *Sk 1 st.  Dc, ch1, dc in next st.*  Repeat to end.  Join with sl st in 3rd ch of ch 4.
R4: Sl st in next sp.  Ch 3.  2 dc in same sp.  3 dc in each space around (3dc cluster).  Join with sl st in top of ch 3.
R5: Sl st in next st (center st of a 3dc cluster).  Ch 4 (counts as dc, ch 1).  Dc in same st. *Sk 2 st.  Dc, ch 1, dc in next st.*  Repeat to end.  Join with sl st in 3rd ch of ch 4.
R6-R7:  Repeat R4 & R5.
R8:  Ch 2.  Sc in each st.  Do not join.  Tie off and hide ends.

Using blunt yarn needle and long piece of yarn, weave yarn under both loops of sc stitches, beginning with needle going from outside to inside of apple cover on first stitch, then inside to outside on next stitch.  Repeat this all the way around.  Leave a long tail to use to tie up when an apple is inside. 

Tuesday, August 7, 2012

Back To School: Creamsicle Bookmark Pattern


The orange and white of this bookmark reminds me of a creamsicle!  Yum!  Since summer is coming to a close, it seemed only appropriate to join two of my favorite summer treats: ice cream and reading!  ;)  This works up quickly and can be done in TONS of color combos!

Materials:
2.00 mm steel hook
Size 10 crochet thread
Ribbon - About 1/4 inch thick

Ch 59.
R1: Tc in 5th ch from hook.  *ch 3.  Skip next 3 st.  Tc*  Repeat to last 2 ch's.  Ch 2, join with sl st in 1st ch made.  
R2: Ch 3.  7 dc in same space.  Sl st in next space.  Ch 3.  7 dc in same space.  *1 sc in next space.  8 dc in next space.*  Repeat to end.  Sl st, 8 dc, sl st in end space.  Now work around the other side.  Sl st in next space.  Ch 3.  7 dc in same space.  *1 sc in next space.  8 dc in next space.*  Repeat to end.  Join with sl st in top of ch 3.  Tie off and hide ends.

Weave ribbon between square spaces running up the middle of the bookmark.  Secure with glue dots or hot glue if desired. 

Wednesday, July 25, 2012

Lined Granny Lovies


These are so fun!  The granny stitch makes for a fast workup, and these are easy to line with fabric!  I made these and lined them with a fat quarter.  :)  The size makes them perfect for a Lovie blanket for any little one to carry around the house.  You could easily make these larger to bigger quilts.  My husband loves crocheted blankets, and I think the next one I make for him will be lined this way!
Lined Granny Square Lovies

Materials Needed: This really depends on you.  Any yarn will do, and you just need the appropriate hook size for the yarn you choose.  I used up some leftovers of Caron Simply Soft and an H Hook.

You will also need thread and either a sewing machine or a needle and some patience.  :)

Basic Granny Square Instructions:
R1:   Ch 4.  Join with sl st in 1st ch made to form a circle.  Ch 3.  2 DC in center of circle.  Ch 1.  3 DC in circle.  Ch 1.  3 DC in circle.  Ch 1.  3 DC in circle.  Ch 1.  Join with sl st in top of ch 3.  Turn work.

You may change colors here if you choose.

R2:  Sl st in ch 1 sp just made.  Ch 3.  2 DC, ch 1, 3DC in same space.  Ch 1.  *3 DC, ch 1, 3 DC, ch 1* in each sp around.  Join with sl st in top of ch 3. Turn work.

You may change colors here if you choose.

R3 and beyond:  Sl st in ch 1 sp just made.  Ch 3.  2 DC in same space.  In each ch 1 space (except corners) you will made 3 DC, ch 1.  In each corner, you will make 3 DC, ch 1, 3 DC, ch 1.

Make the square as big or small as you like.  You can even make a group of smaller squares and stitch them together to make one big square or a rectangle or whatever shape you like!

To Line Blanket/Lovie:
Choose a large enough piece of fabric to line one side of the blanket while leaving a border.  I purchased a fat quarter (18" x 22") for my blanket which measured about 19 1/2" square.  Iron your fabric flat.  Trim fabric to desired size and pin to your crochet work.  Sew using thread to match the yarn color you are sewing through.  For example, I chose pink thread and sewed through the layer of fabric and the crochet work through one of the pink lines.  This way, when you look at the blanket on the crochet side, the thread isn't easily noticed.  You can hand sew this as well, but my sewing machine is much faster.  :)  I also sewed a bit in the center.  I would recommend doing that by hand if possible.  Just sew the center circle to the fabric.  I used my machine and needed more space, so I have a square in the middle of my fabric - which is fine with me as I plan to cover it with an applique.  That is a tutorial for later!  ;)

Friday, July 13, 2012

Fluffy Duster

My house accumulates an impressive amount of dust.  We dust every day.  Every.  Single.  Day.

So, why not make the job a little bit easier, faster, and more fun for my awesome helpers!  (Thanks, kids!)


Can you see the dust?
Finished dusting the shelf - Now, throw it in the washer!

Fluffy Duster

Materials:
Pipsqueak Yarn by Bernat (I used Funny Bunny Print)
I Hook
Yarn needle

Chain 4 (This makes 1 ch + ch 3, which will count as a DC)
R1: Make 7 DC in first ch made.  Join with sl st in top of ch 3.  (8 DC)
R2: Ch 3.  1 DC in same st.  2 DC in each st around.  Join with sl st in top of ch 3. (16 DC)
R3: Ch 3.  1 DC in same st.  1 DC in next st.  *2 DC in next st.  1 DC in next st.*  Repeat around.  Join with sl st in top of ch 3.  (24 DC)  Do not cut yarn.

Strap:
Row1: Ch 3.  1 DC in each of next 4 st.  Ch 3, turn.
Row2-5: 1 DC in each of next 4 st.  Ch 3, turn.
Attach end of strap directly on the other side of the circle you've made with yarn needle.

Monday, July 2, 2012

Crochet Rosette Headband


New pattern available!  This is an easy pattern that works up quickly and has a beautiful result!  The pattern is available in both the Etsy Shop and on Craftsy!

Thursday, June 14, 2012

Flag Rug

Happy Flag Day!  And...  Happy Anniversary to the greatest husband a wife could ask for!

Also, I just want to express my gratitude for everyone who puts up a flag on our anniversary.  It's good to know that the whole country is rooting for us and supports our family and marriage.  Thanks, America!  ;)

Ha ha, but seriously...  Words could never properly convey the love and appreciation I have for my husband.  There is such comfort in being able to be myself with him, 100% of the time.  I can be silly, angry, sad, sappy, tired, cranky, goofy, hyper, happy, or any number of things and I know he will stick with me with every ounce of love he's had for me since the day we were married.  That kind of loyalty is a rare gem. 

In honor of the occasion, I thought about crocheting a gigantic blanket with my husband's face on it... 

Ha ha, no, I really didn't.  ;) 

I actually wanted to honor Flag Day. 


Flag Rug

Materials:  Lion Brand Hometown USA Yarn in Cincinnati Red (2 skeins), New York White (2 skeins), and San Diego Navy (1 skein) - or other Super Bulky Weight Yarn
N Hook

Begin with Red.
Ch 53 (or to desired length).
DC in 4th ch from hook, and each stitch across.  Turn.
Switch to White.
Ch 3.  DC in each stitch across.  Turn.
Switch to Red.
Ch 3.  DC in each stitch across.  Turn.

Continue in a similar fashion, DC'ing across each row, but switching colors between red and white to create the striped effect.  Continue this until you have the desired height of the rug, taking into account the border.

Border:
Use Blue.
Beginning in any corner, attach yarn and chain 3.  4 DC in same corner stitch.  DC in each stitch (make 2 DC in each stitch when working along the sides of the rug, where the stitches are tall).  Make 5 DC stitches in each corner stitch.  Join with sl st to top of ch 3.


I am thinking of embellishing this with a star motif.  If I do (if I have time!) I'll post the pattern for that as well!